Disclaimers:
First of all, this project discusses extracting the audio from DVD Video discs, not DVD-A / DVD Audio discs. DVD-Audio discs use an advanced form of encryption than cannot be digitally extracted / ripped.
Extracting / ripping may be a violation of local laws. These instructions should only be used for content you own and it should only be used for personal use only.
Overview:
You think to yourself “why purchase both the CD and DVD of a concert when the DVD contains all the audio you need?” Since you purchased the audio on the DVD, it makes sense that you would copy audio from the DVD to your computer / mp3 player without additionally purchasing a CD in addition to the DVD. This page gives step-by-step detail on how to extract the high quality (24 bit / 96 kHz or 24 bit / 48 kHz) 2-channel PCM audio track from a Video DVD and store it in a lossless (WMA lossless, FLAC) or compressed (MP3, AAC, OGG) format.
Step 1: What you need
- A DVD that you own with a high quality stereo audio track.
- If you want to rip the compressed Dolby Digital or DTS audio tracks, please see this page on the SlimDevices forum.
- A PC running Windows XP (older versions of Windows may work as well)
- DVD-ROM drive
- 10 GB (minimum) of free hard drive space
- DVD Shrink 3.2.0.15 DVD decrypter: http://www.dvdshrink.org/
- Alternative: DVD Decrypter: http://www.dvddecrypter.com/
- vStrip GUI audio stream separator: http://www.doom9.org/index.html?/software.htm
One of the following programs (dbPowerAmp is easier to use, LPCM24 seems to be more reliable):
- DB PowerAmp Music Converter: http://www.dbpoweramp.com/dmc.htm + DB PowerAmp Muisc Converter Plugin (Raw Input Decoder + favorite lossless codec): http://www.dbpoweramp.com/codec-central.htm
- LPCM24 24-bit raw stream processor: http://www.rarewares.org/others.html
Step 2: Extract the DVD to your Hard Drive
- Open DVD Shirnk to back-up the DVD to your hard drive. Point it to your DVD drive if it does not auto-detect it. Your DVD will be quickly auto-scanned.
- Click the Re-author button on the tool bar.
- Click the DVD Browser Tab
- Drag the main movie from the right-hand panel (Title 2 below, but what ever is under “main movie”) to the DVD Structure panel on the left.
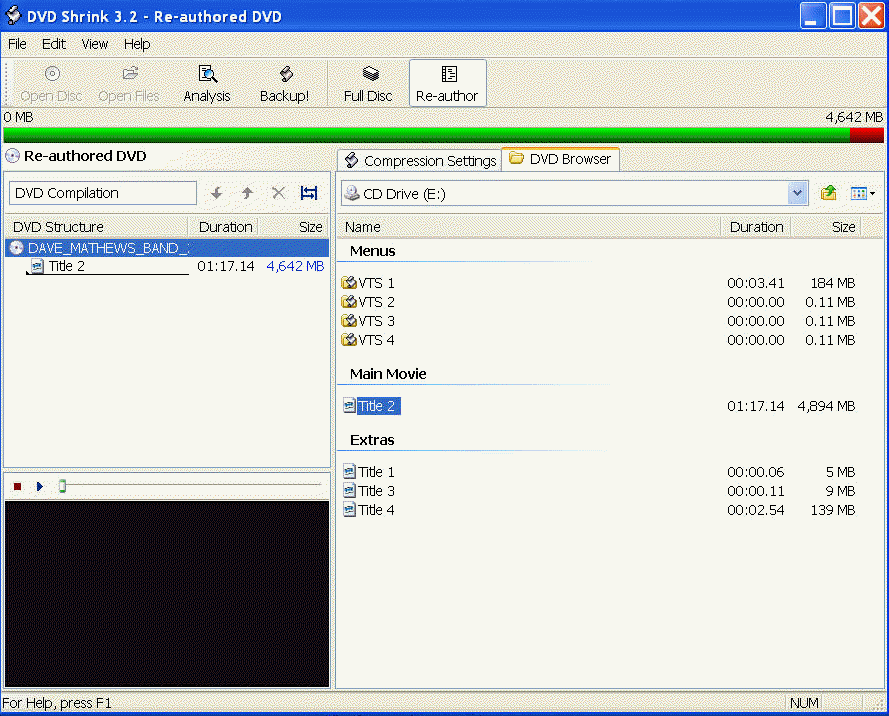
- Click the Compression Settings tab.
- Under Audio, select LPCM 2-ch and un-select AC3 and/or DTS
- If you want to convert a Dolby Digital or DTS track, it will probably be of lower quality than the LPCM track and will only play back on a devices with the proper decoder. This guide is of limited used for Dolby Digital or DTS tracks. Please see this page on the SlimDevices forum instead.
- Click the Backup! button
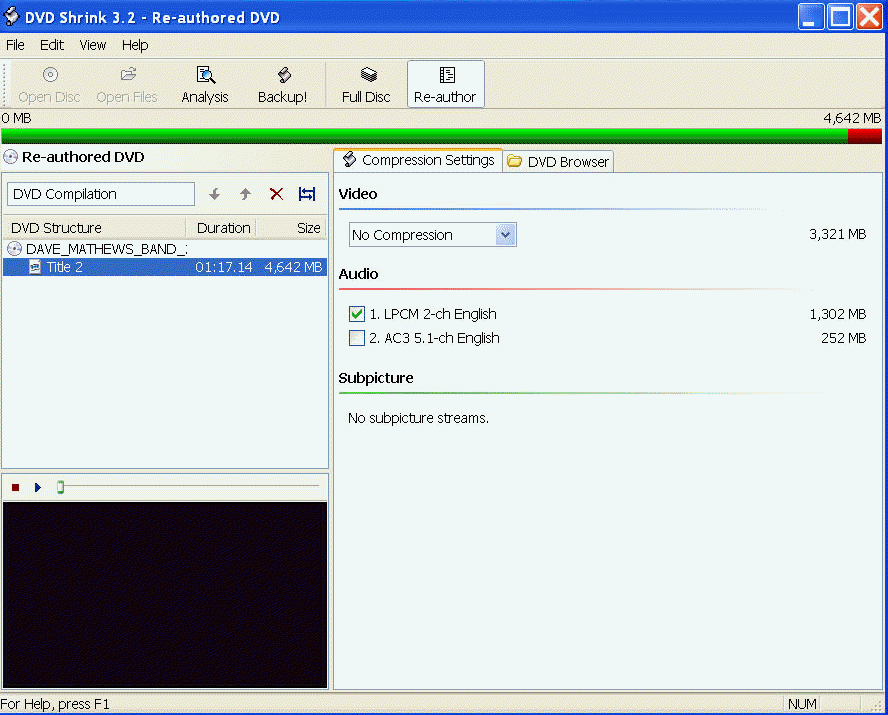
- Accept any error message that may pop up
- Select the target directory where DVD will be saved and rip the DVD
- ignore any prompts to burn to a writeable DVD afterwards.
Step 3: Strip the LPCM audio track from the VOB files using vStrip
- Go to the 1 Input tab
- Click the Add… button, go the to directory where you ripped the DVD, and select all of the VOBs you ripped in the previous step
- Make sure the VOBs are in the correct numerical sequence, as shown below. Use the Up and Down or Sort buttons to change the order.
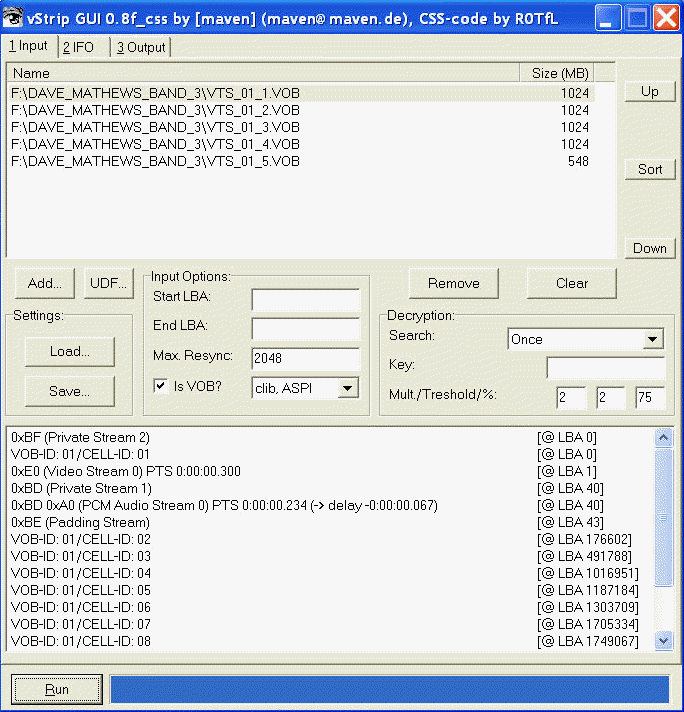
- Go to the second tab 2 IFO
- Browse to the DVD directory on your hard drive and select the IFO file for the DVD you just ripped.
- You should see something similar to what is shown below

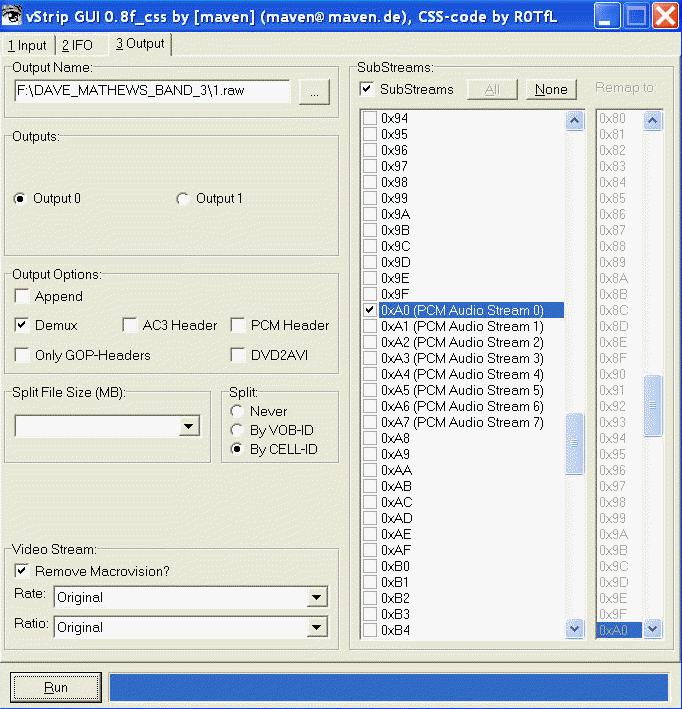
- Go to the third tab 3 Output
- Select an output file name (concert name)
- Save it as “Raw PCM stream” file type
- In the “Streams” section, click the None button, then select the SubStreams box
- Select the substream for the audio, for LPCM streams this is usually 0xA0 (PCM Auido Stream 0)
- In the “Output Options“, select the “Demux” box, and make sure nothing else is selected
- In the Split box, select “by CELL-ID” (this will cause the output files to split between each song / chapter)
![]()
- Click the Run button to generate the LPCM RAW audio files
Step 4: Convert LPCM into another format using LPCM24
- After the LPCM stream has been demuxed, copy the LPCM24 program into the directory where the file are located.
- Open a Command Prompt window and change to that directory.
- Run LPCM24 by entering:
lpcm24.exe input_file_name.raw output_file_name.wav
- The audio format is usually 24-bit 48 kHz, but sometimes it is 24-bit 96 kHz or 16-bit 44.1 kHz (standard CD quality)
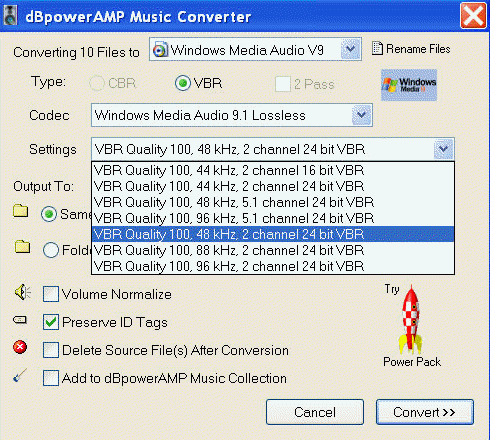
- Now, use DB Power Amp Music Converter to convert the WAV file to your favorite music format. I suggest a lossless format such as FLAC. WMA Lossless is another option. If you must use a lossy format, I suggest a very high quality Variable Bit Rate MP3.
- Now test that you can play the file with your favorite music player (DB Power Amp, Foobar 2000, Winamp, CoolEdit, etc.) If you ripped to a lossless format, be sure that your music player can handle 24-bit 48 kHz and/or 24-bit 96 kHz music.
- If the music sounds way too slow or way too fast, you probably selected the wrong data rate. 24-bit 48 kHz is the most common but if it sounds totally weird, you probably input the wrong format. Convert using a different input type and try again.
i hope it works!!!
Great set of instructions but: I have been able to follow them up to step 4. Even though I have downloaded and installed the .raw decoder, dbPower does not seem to recognize the .raw format. I got the .raw decoder from the legacy codec page, is there a newer version that I should have found. Thanks in Advance
I posted about this on their forum. Their RAW codec does not support the RAW data from a DVD. I should have updated this page but have not. You’ll need to use the LPCM24 24-bit raw stream processor from http://www.rarewares.org/others.html . It’s a command-line program, but it will properly perform the conversion.
This site is great. I have a question about step 4. I’m new to using the command line. Can you walk me through this. I have my LPCM tracks in a folder on my desktop. I’m having some issues with this step:
* Open a Command Prompt window and change to that directory.
I’m not sure how to do that. I can open the command line, but I’m not sure how to change directories. If I type in the file path to the folder with my LPCM tracks I get something like not a recognized command. I’m not sure how to run prgrams using the command line so the next step stumps me as well. If I I type the command line below with my file name inserted i get the same message as above….not recognized command. Any help you can provide would be great.
* Run LPCM24 by entering:
lpcm24.exe input_file_name.raw output_file_name.wav
Do I have to enter all of the file names manually, or is there a better way. By the way the CD Audio extraction is fantastic. I’ve been using this for some time since I found your instructions.
Phil, you use the cd (change directory) command to change directories. Put quotes around the file/directory name if it contains spaces. So for example:
cd “cd:documents and settingsusernamedesktopdvd audio”
lpcm24.exe “input file name.raw” “output file name.wav”
It’s much easier if you put the lpcm24.exe in the same directory as the music files being converted.
Thanks Carlton, that did the trick. My next question is now that I have converted the raw files to wav using the following command:
lpcm24.exe “home2_V01C02.raw” “home2_V01C02.wav”
I get a 24bit/96KHz file. The playback is very fast (unrecognizable). If I use the following command:
lpcm24.exe -44.1 “home2_V01C02.raw” “home2_V01C02.wav”
I get a 24 bit/48KHz file. The playback is still fast, but it is inteligible. What should I be troubleshooting? I’ve ripped the VOB files correctly. I followed the directions very closely above. I’ve tried to use the following command but it gave me an invalid argument error.
lpcm24.exe -44.1 “home2_V01C02.raw” “home23_V01C02.wav”
Again, thanks for your help so far.
I should probably mention that I ripped the VOB files using DVDfab5.
Phil: You have 2 options. If you want a standard file that is playable by any music application, convert it to a 16-bit, 44.1 kHz wav file. If you want to play by the high-definition original, you’ll need a software player that can send the original 24-bit, 96 kHz file out the digital output of your computer to a receiver that can decode at that bit rate.
For simplicity, I think the down-conversion to a lower fidelity is worth more than the hassles of trying to play back the original audio stream.
Carlton I’ve been using the lpcm24 program. It’s been working great. The one issue I have is the command line for multiple files. I convert a file, then type in the next file, etc. What is the best way to convert multiple files from raw to wav instead of having to type each file name after each conversion. Is there a batch mode syntax for the command line? As always thanks so much for your help.
Phil, unfortunately, I’ve haven’t found a way to automate the process. I just hit the “up arrow” key to bring up the previous command in the command prompt, edit it, and hit enter to get it to run again.
It is possible to drag a file and drop it on an executable from within Windows File Explorer, but lpcm24.exe requires that an output file name be specified, so I don’t believe this method works in this case.
That’s what I’ve been doing as well. It would be nice if someone could develop a nice GUI or work with the multifrontend program to add this program to it. Thanks for the quick response.
Carlton, Does this method work with DVD’s that have AC3 2 channel audio rather than the LPCM
Phil, this method works for de-muxing the audio file from the DVD video. You’ll need a different program to convert the ac3 audio to a standard format, and I’m not sure what software supports that.
Thanks for this guide – found it very useful, especially the first half.
I had trouble getting lpcm24 to work with my DVD. Ended up using eac3to instead (available from Doom9 site) which allowed more flexibility when interpreting the PCM files.
Noticed an earlier comment about having difficulty batch converting files. I wrote a four line script to do this for me:
REM Add a .pcm extension to the vStripped files to help eac3to
FOR %%I IN (T*) DO MOVE “%%I” “%%I.pcm”
REM Convert 2 channel, 16 bit, 48KHz PCM files to WAVs
FOR %%I IN (T*.pcm) DO eac3to.exe “%%I” “%%~nI.wav” -override -2 -16 -big
To make your own version copy the two lines into a text file using the file extension .bat or .cmd, change the value in the parenthesis to match your files (my files started with a T and had no file extension), then save the file. You might need to experiment with the eac3to parameters to get the desired result.
Thanks Matt for the very helpful comments. This will definitely be beneficial to me and to others as well.
Great stuff. This helped me out immensely. Thanks.